Common Settings for 3D Scene Beautification
background needs
SuperMap iClient3D for The scene effects of WebGL are not limited to what you see every time you open it, it can also perform various personalized settings. For example, make a clear sky; adjust the light and shadow of the setting sun; create special effects of technological city night scenes; show the outline of the white model's border; optimize the texture effect of the fine model, etc. From the effect of the sky, to the lighting of the scene, and the appearance of the model can be changed or set.
This document describes the following aspects:
- Sky background related settings (sky box, atmosphere, sun halo);
- Scene default lighting settings (ambient light, sun light);
- Custom scene light source;
- The impact of HDR on the scene;
- The processing of model baking texture;
- Scene/layer color adjustment;
- Optimization of model boundary effects;
- Display and optimization of model border lines
- How to add a custom light source in a plane scene
Function Introduction
2.1 Sky background related settings
The functions related to the sky mainly include: skybox, atmosphere, sun halo, etc.
2.1.1How to make a custom skybox effect
1. Make skybox material
- ①Number of images: a set of six skybox images;
- ②Naming and placement of images: Arrange the six images according to the order marked on the left image; then rotate the corresponding angle according to the form of the right image;
- ③Image size: 1024×1024 pixels (or 2048×2048 pixels)
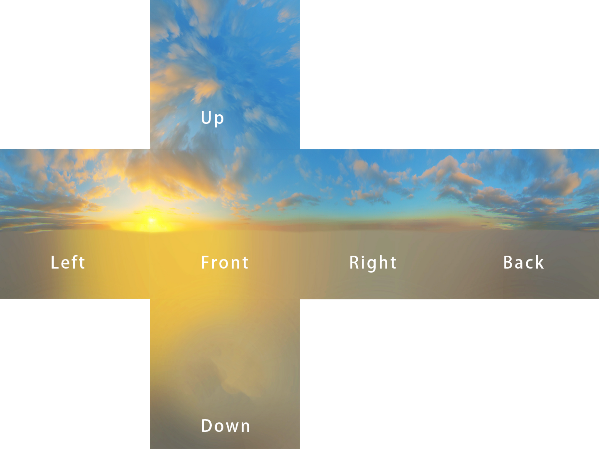
Figure 1
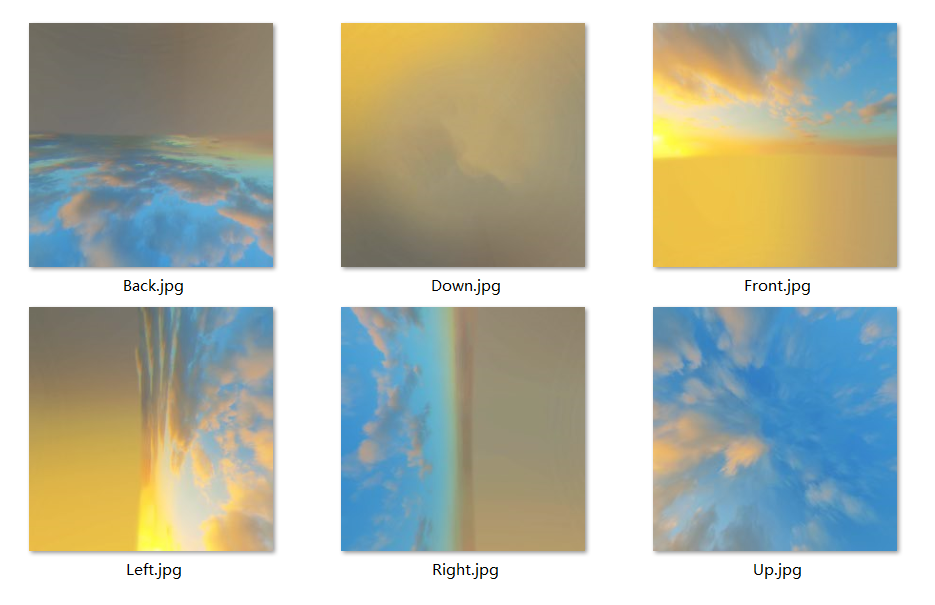
Figure 2
2. How to use
- ①Create a custom skybox and map the pictures to different orientations
                sources: {
                    positiveX : './images/天空盒素材/晴天/Right.jpg',
                    negativeX : './images/天空盒素材/晴天/Left.jpg',
                    positiveY : './images/天空盒素材/晴天/Front.jpg',
                    negativeY : './images/天空盒素材/晴天/Back.jpg',
                    positiveZ : './images/天空盒素材/晴天/Up.jpg',
                    negativeZ : './images/天空盒素材/晴天/Down.jpg'
                }
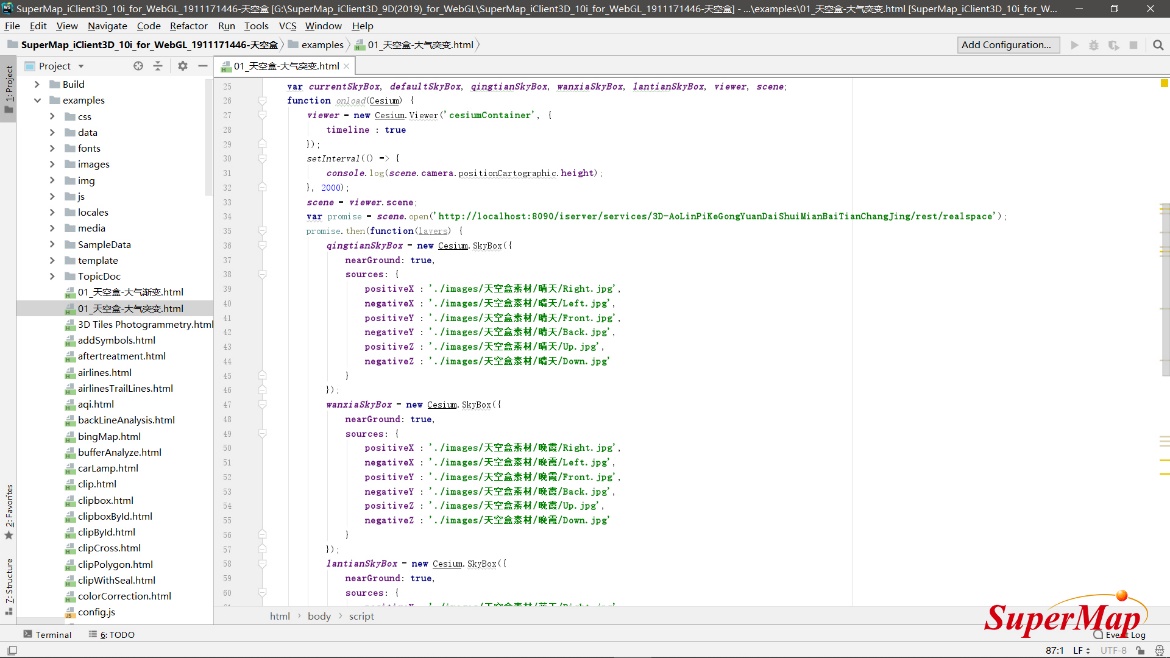
Figure 3
- ②Controls the conditions under which custom skyboxes appear
When creating a scene, the system will create a starry sky effect "sky box" and the atmosphere surrounding the earth by default.
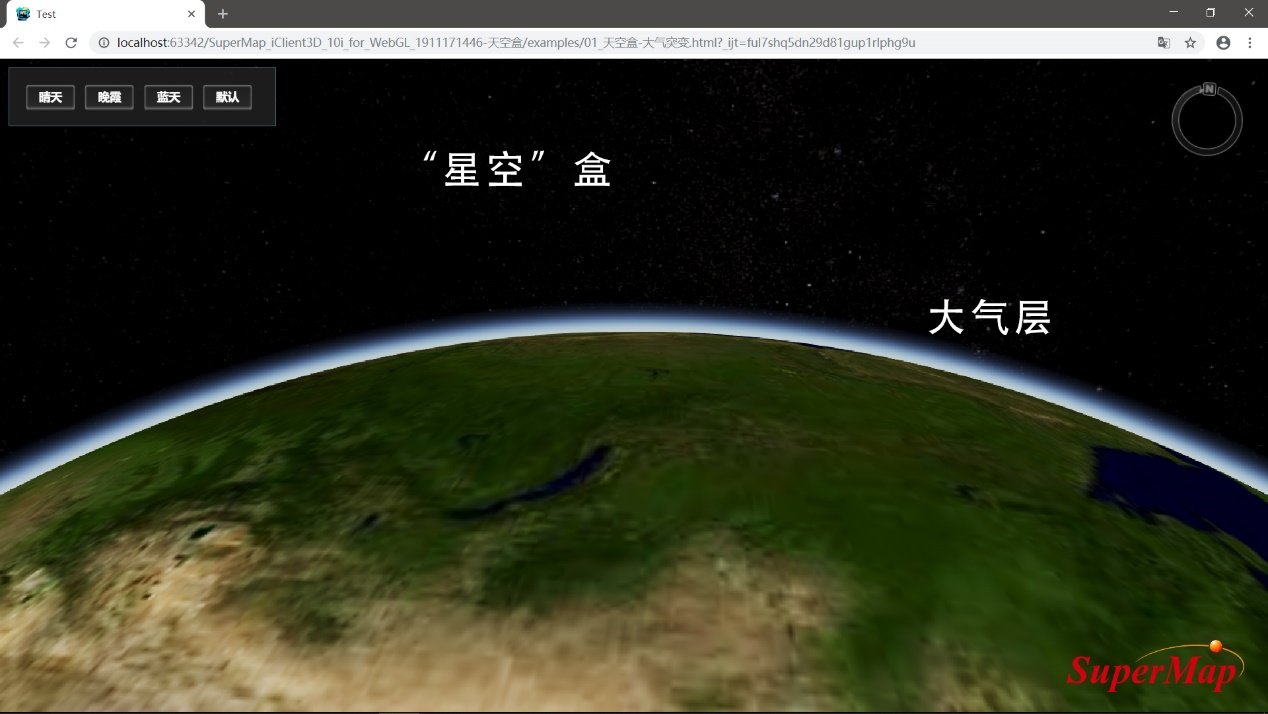
Figure 4
And when we zoom in and enter the ground plane, we need to switch to the sky effect.
Here we set a height, when it is higher than this height, we are far away from the earth, and what we see is the atmosphere and starry sky around the earth; when it is lower than this height, we are closer to the earth, and we will see the sky Effect.
                scene.postRender.addEventListener(function() {
                  var cameraHeight = scene.camera.positionCartographic.height;
                  var toggleHeight = 23e4;
                  if(cameraHeight < toggleHeight && SuperMap3D.defined(currentSkyBox)) {
                     scene.skyBox = currentSkyBox;
                     scene.skyAtmosphere.show = false;
                    }  else {
                       scene.skyBox = defaultSkyBox;
                       scene.skyAtmosphere.show = true;
                     }
                });
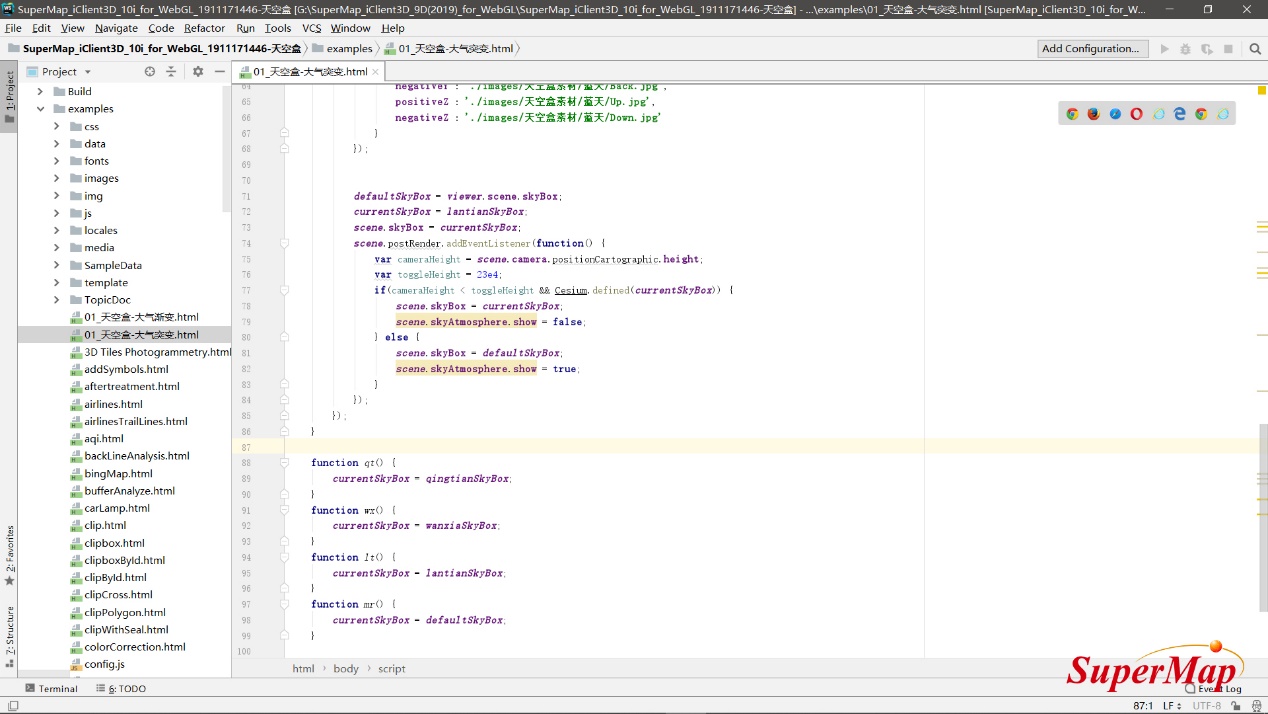
Figure 5
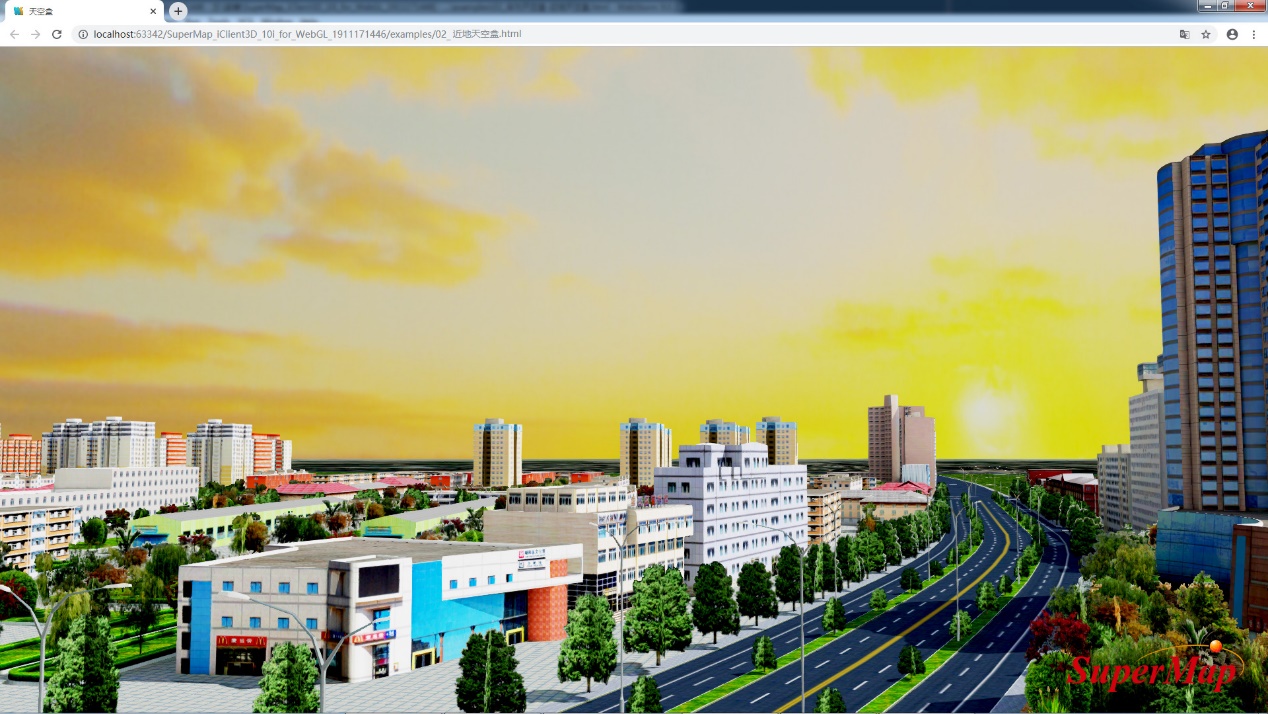
Figure 6
- ③In addition, if you want to have a gradient effect in which the atmosphere gradually disappears and the sky gradually appears when you zoom in on the scene, you can achieve it by controlling the transparency of the two.
3. Precautions
- ①The sequence and rotation angle of the six skybox pictures must be correct, otherwise the sky in the scene will be displayed abnormally;
- ②This function is only supported in SuperMap_iClient3D_10i_for_WebGL versions after October 2019.
2.1.2How to change the rendering of the atmosphere
1. Quickly change the rendering effect of the atmosphere
Set viewer.scene.globe.enableLighting = true; turn on the time axis at the same time, by changing the time, you can quickly adjust the effect of the atmosphere.
The code to open the time axis is as follows
            function onload(SuperMap3D) {
                var viewer = new SuperMap3D.Viewer('Container', {
                    timeline: true
                });
             }
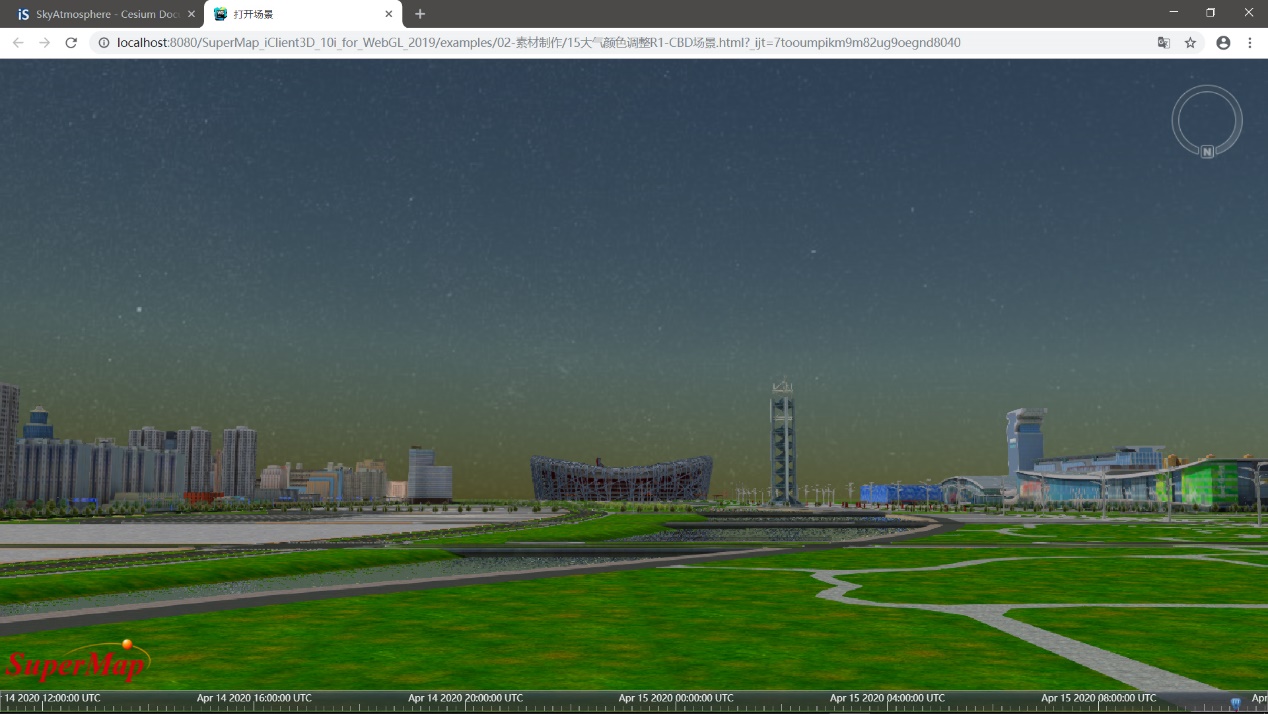
Figure 7
2. Custom control the rendering effect of the atmosphere
How to make a warm atmosphere? By controlling the hue of the atmosphere to shift towards orange-yellow, while reducing its brightness and saturation. If you still want the stars to be faintly visible, you can also reduce the transparency of the atmosphere.
             // turn on the atmosphere
            scene.skyAtmosphere.show =true;
             //Modify the brightness of the atmosphere
            scene.skyAtmosphere.brightnessShift=0.1;
             //Modify the color tone of the atmosphere layer
            scene.skyAtmosphere.hueShift=0.5;
             //Modify the saturation of the atmosphere
            scene.skyAtmosphere.saturationShift =0.1;
             //Modify the transparency of the atmosphere
            scene.skyAtmosphere.alpha =0.8;
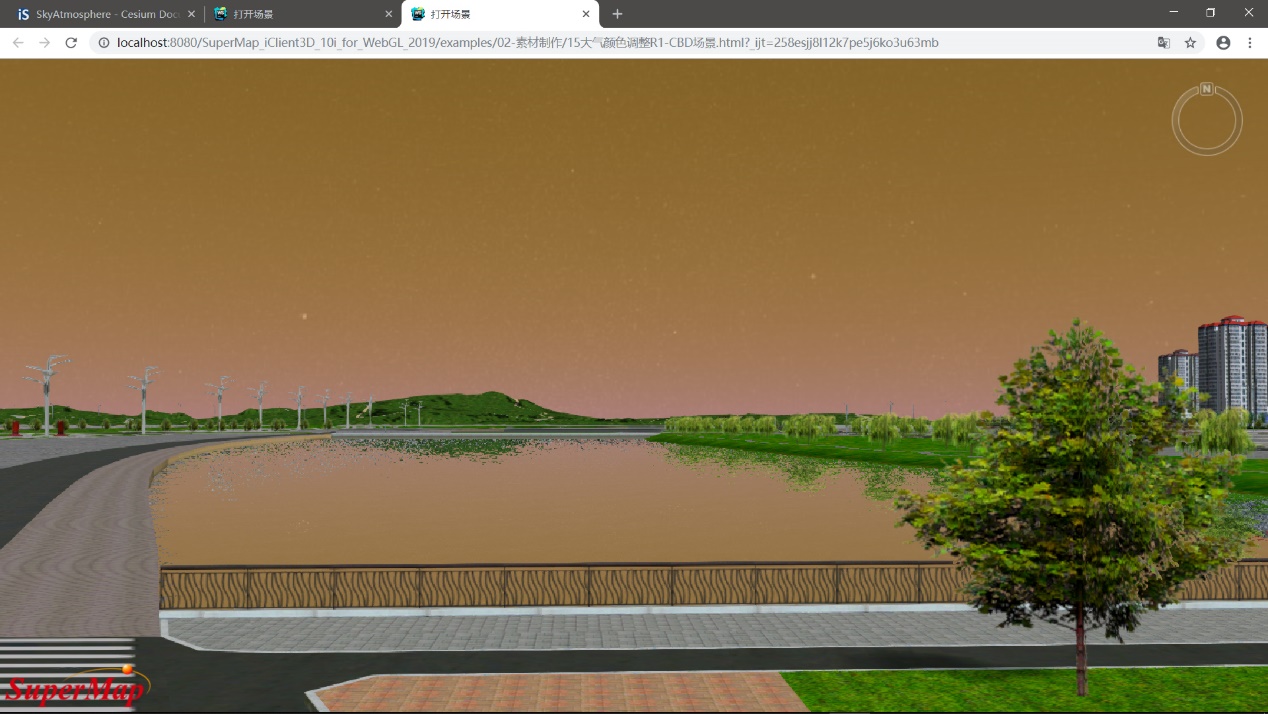
Figure 8
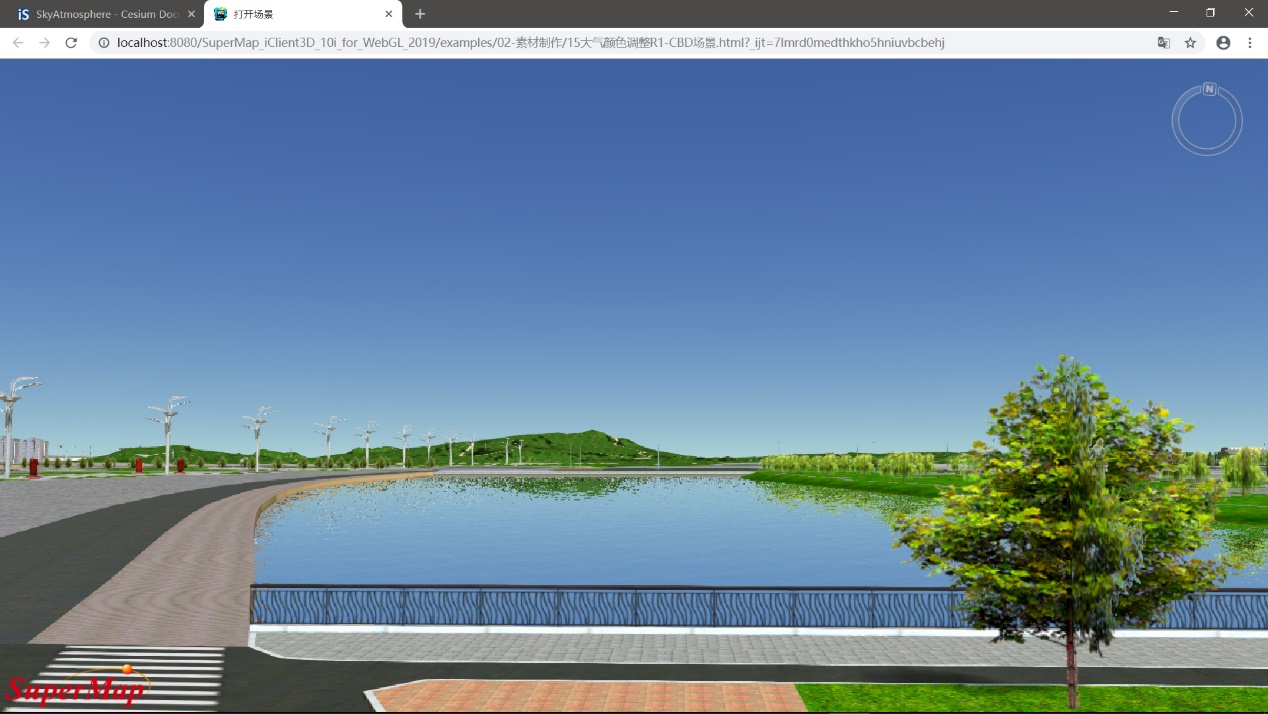
Figure 9
2.1.3How to change the display of the sun
The display effect of the sun mentioned here refers to changing the "appearance" of the sun, not changing the "light" it emits. This is achieved by adjusting the value of scene.sun.glowFactor.

Figure 10
2.2 Scene Default Lighting Settings
In SuperMap iClient3D for WebGL, there are two light sources by default in the scene:
- ①Ambient Light (ambientLight);
- ②Sunlight (sunLight)
Both together determine the lighting effect in the scene.
2.2.1How to adjust the effect of ambient light
Ambient light emits light from all sides to illuminate the scene, and has no directionality. There are three common scenarios where ambient light needs to be adjusted:
- ①In night scenes or darker scenes, a darker ambient light is required;
- ②The texture of the model itself has heavy baked shadows, and a brighter ambient light is needed to increase the brightness of the shadow parts;
- ③Adjust the parameters of ambient light in conjunction with other light source effects in the scene.
In the scene shown in the figure below, a very low value ambient light effect is set (in order to highlight the self-illuminating texture effect on the model), set
scene.lightSource.ambientLightColor = new SuperMap3D.Color(0.1, 0.1, 0.1, 0.1)
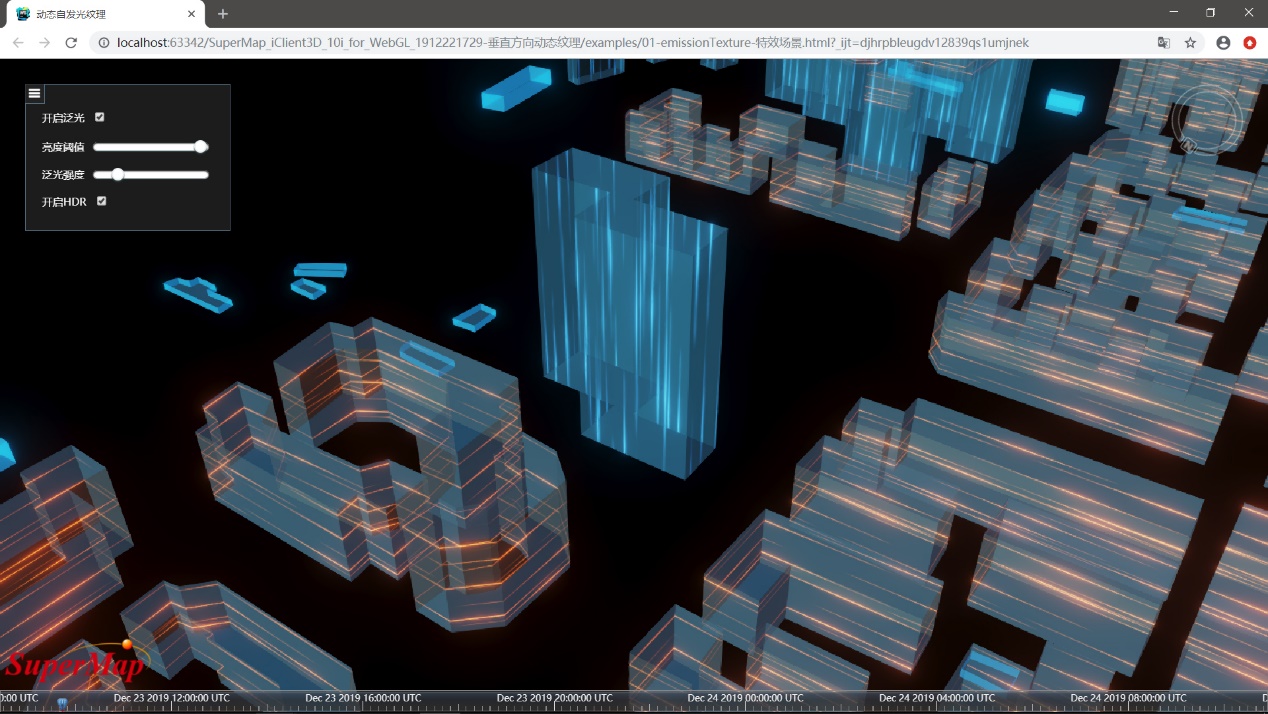
Figure 11
2.2.2It does not work after modifying the light
If the object in the scene is a glTF model added as an entity, after adjusting the sunlight and ambient light, the lighting effect of the model will not change. So how to set up if you want to make a night scene effect? It can be adjusted by modifying the value of imageBasedLightingFactor.
            var gltf1 = viewer.entities.add({
                name: "gltf",
                position: new SuperMap3D.Cartesian3.fromDegrees(xxx,yyy, 0),
                model: {
                    uri: "../data(范例)/04-临时测试/Gltf/name.gltf"
                }
            });
            var imageBasedLightingFactor = new SuperMap3D.Cartesian2(0.1, 0.1);
            gltf1.model.imageBasedLightingFactor = imageBasedLightingFactor;
            viewer.zoomTo(gltf1);
2.3 How to customize the light source effect in the scene
In SuperMap iClient3D for WebGL, it supports custom setting of light sources. The types of light sources that can be added are: parallel light, point light source, and spotlight.
2.3.1Using custom parallel light to optimize the display effect of the white model
As shown in the picture below, create a white mold effect with a more design sense by adding a custom parallel light.
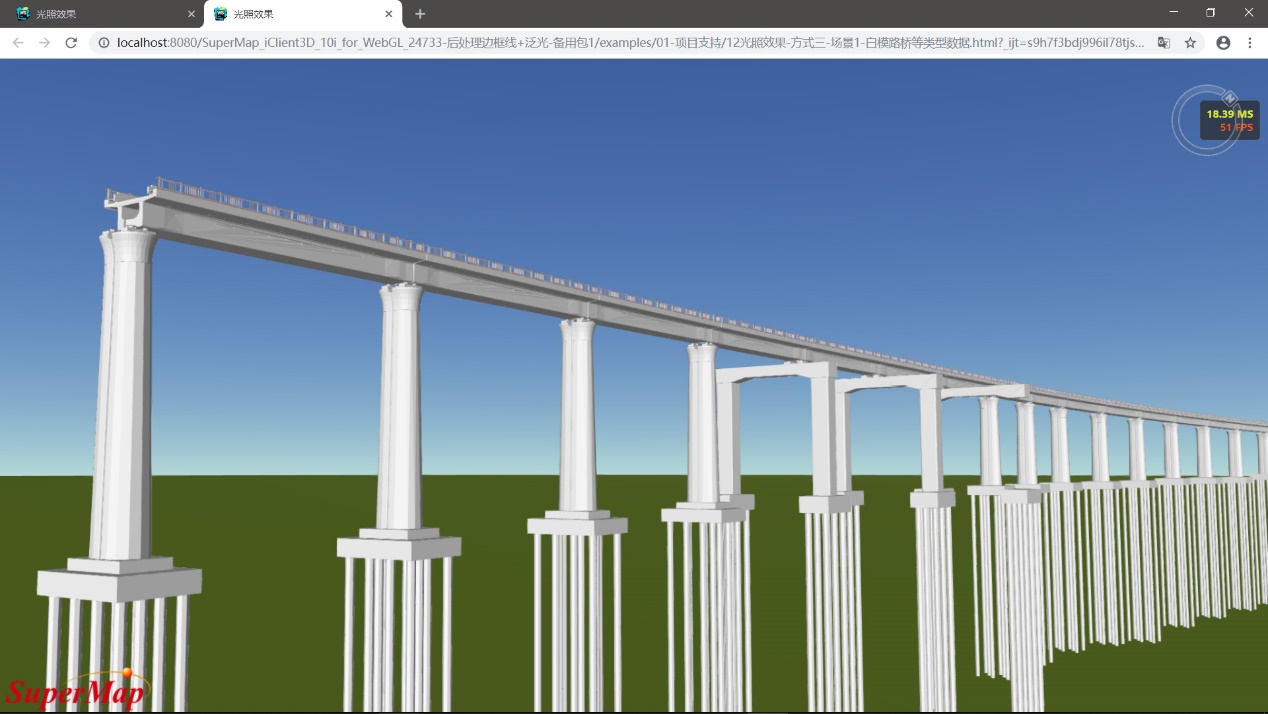
Figure 12
Scene light adjustment ideas:
- ①Ambient light setting (because the model itself has no texture, only color, the ambient light should not be too bright);
- ②The setting of the parallel light of the main light source (for the white model, it is easier to express the sense of design with the side flat light);
- ③The brightness of the final scene should be able to display the largest range of grayscale.
Specific adjustment methods and parameter settings:
1. Modify the parameters of the default lighting
Turn off the sun light and dim the ambient light to give a brighter atmosphere effect.
                    //Default scene settings
                    //Set whether the sun is on--turn off the sun light
                    scene.sun.show = false;
                    //Set the intensity of the ambient light
                    scene.lightSource.ambientLightColor = new SuperMap3D.Color(0.5, 0.5, 0.5, 1);
                    //Modify the brightness of the atmosphere
                    scene.skyAtmosphere.brightnessShift=0.4;
2. Add a custom parallel light source
           //add light source
           //Southeast 45 direction
           //The inclination angle of the light source is relatively flat, which makes the contrast between the road surface and the bridge piers relatively high.
            var position1 = new SuperMap3D.Cartesian3.fromDegrees(xxx,yyy, 445);
            var targetPosition1 = new SuperMap3D.Cartesian3.fromDegrees(xxz, yyz,430);
            var dirLightOptions = {
                targetPosition: targetPosition1,
                color: new SuperMap3D.Color(0.8, 0.8, 0.8, 1),
                intensity: 1
            };
            directionalLight_1 = new SuperMap3D.DirectionalLight(position1, dirLightOptions);
            scene.addLightSource(directionalLight_1);
Among them, position1 is the position of the light source, targetPosition1 is the target point of the light source, and the two determine the angle of the light.
2.3.2Using custom parallel light to optimize the display effect of fine models
The fine model is different from the white model. On the basis of restoring the texture, it can better show the three-dimensional effect of the model.
As shown in the figure below, explain.
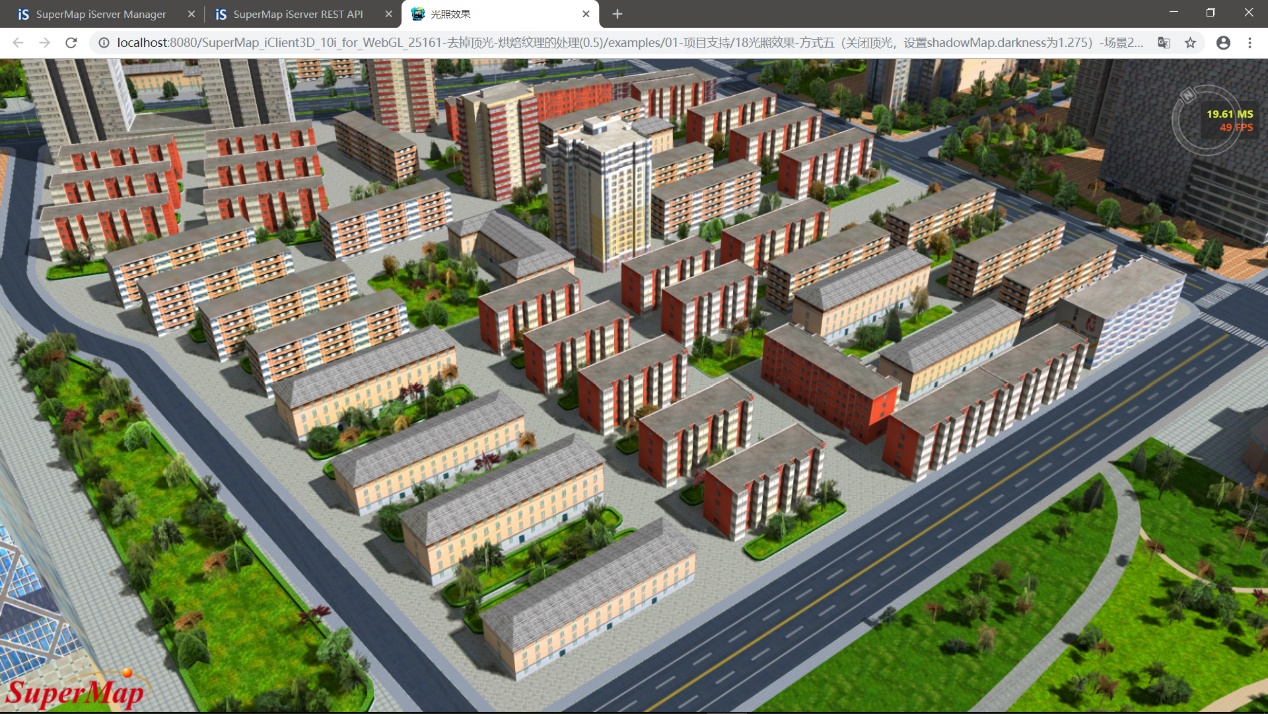
Figure 13
Scene light adjustment ideas:
- ①Ambient light setting (Since the model itself has obvious baked texture, the light and shade effect of the texture itself is relatively obvious, the ambient light only needs to ensure that the texture in the dark part can be seen clearly);
- ②The setting of the parallel light of the main light source (reversely deduced from the baked texture of the model itself, the light setting when the data is baked: the direction of the light source is the southeast side, and the light angle is relatively flat. Based on this, set up a similar light source, To ensure that the light and dark effects of the data are coordinated) specific adjustment methods and parameter settings:
1. Modify the parameters of the default lighting
Turn off the sun light and dim the ambient light slightly.
             //Default scene settings
             //Set whether the sun is on--turn off the sun light
            scene.sun.show = false;
             //Set the intensity of the ambient light
            scene.lightSource.ambientLightColor = new SuperMap3D.Color(0.65, 0.65, 0.65, 1);
             //Modify the brightness of the atmosphere
            scene.skyAtmosphere.brightnessShift=0.4;
2. Add a custom parallel light source
                //add light source
                //Southeast 45 direction, the inclination angle of light is about 25°
                var position1 = new SuperMap3D.Cartesian3.fromDegrees(xxx,yyy,,480);
                var targetPosition1 = new SuperMap3D.Cartesian3.fromDegrees(xxz,yyz,,430);
                var dirLightOptions = {
                    targetPosition: targetPosition1,
                    color: new SuperMap3D.Color(1.0, 1.0, 1.0, 1),
                    intensity: 0.55
                };
                directionalLight_1 = new SuperMap3D.DirectionalLight(position1, dirLightOptions);
                scene.addLightSource(directionalLight_1);
2.3.3Using custom light sources to create city night scene effects
As shown in the figure below, explain.

Figure 14
1. Because it is a night scene, first turn off the sunlight and ambient light.
                scene.sun.show = false;
                scene.lightSource.ambientLightColor = new SuperMap3D.Color(0, 0, 0, 1);
2. Add a parallel light and a point light source to the scene as the bottom light
The position of the parallel light is not limited, ensuring that the entire scene can have a bluish tone. Point light sources are placed near key buildings to increase the brightness of the area and serve as the visual central area of the entire scene.
                        // Add direct light - whole environment
                        var dirLightOptions = {
                            targetPosition: targetPosition1,
                            color: new SuperMap3D.Color(0.01, 0.01, 0.3, 1.0),
                            intensity: 0.1
                        };
                        // Add point light source - the whole environment
                        var pointLightOptions3 = {
                            cutoffDistance: 2000,
                            color: new SuperMap3D.Color(0.04, 0.18, 0.43, 1.0),
                            intensity: 0.001
                        };
3. Create lighting effects for key buildings in turn
Here, taking the tallest building in the scene - China World Tower as an example, add multiple point light sources around it, and set the color of the light source to a cool tone of bluish blue. The height of the point light source is approximately 80 meters to illuminate the middle and lower parts of the building.
And use the same method to add lighting effects to other key buildings.
            // Add point light source - building
            var pointLightPoszuigao1 = new SuperMap3D.Cartesian3.fromDegrees(xxx, yyy, 80.0);
            var pointLightOptionszuigao1 = {
                 cutoffDistance: 360.0,
                 color: new SuperMap3D.Color(0.15, 0.45, 1.4, 1.0),
                 intensity: 0.12
            };
            pointLightzuigao1 = new SuperMap3D.PointLight(pointLightPoszuigao1, pointLightOptionszuigao1);
            scene.addLightSource(pointLightzuigao1);
            var pointLightPoszuigao2 = new SuperMap3D.Cartesian3.fromDegrees(xxx, yyy, 80.0);
            pointLightzuigao2 = new SuperMap3D.PointLight(pointLightPoszuigao2, pointLightOptionszuigao1);
            scene.addLightSource(pointLightzuigao2);
            var pointLightPoszuigao3 = new SuperMap3D.Cartesian3.fromDegrees(xxx, yyy, 80.0);
            pointLightzuigao3 = new SuperMap3D.PointLight(pointLightPoszuigao3, pointLightOptionszuigao1);
            scene.addLightSource(pointLightzuigao3);
            var pointLightPoszuigao4 = new SuperMap3D.Cartesian3.fromDegrees(xxx, yyy, 80.0);
            pointLightzuigao4 = new SuperMap3D.PointLight(pointLightPoszuigao4, pointLightOptionszuigao1);
            scene.addLightSource(pointLightzuigao4);
4. Add a street light effect to the road.
The lights added above are all for buildings, and there will be many street lights on the road.
The effect of street lights is simulated here through spotlights, because street lights have obvious directionality. Because the lights added before are all in cool colors, here we set a more obvious warm color for the street lights to balance the color distribution in the scene.
Because the scene supports HDR, you can set the RGB value (6, 5, 0.2, 1) greater than 1 for the light source color. In addition, set an appropriate attenuation coefficient (3) for the light source to ensure that the light gradually weakens as it spreads around.
At this point, the addition of the lighting system is basically completed.
                // Add spotlight-horizontal road-street light 1
                var spotLightPosludeng1_1 = new SuperMap3D.Cartesian3.fromDegrees(xxx, yyy, 30);
                var spotLightTargetPosludeng1_1 = new SuperMap3D.Cartesian3.fromDegrees(xxx, yyy, 0);
                var spotLightOtionsludeng1_1 = {
                    color: new SuperMap3D.Color(6, 5, 0.2, 1),
                    distance: 100,
                    decay: 3,
                    intensity: 13,
                    angle: Math.PI / 2
                };
                spotLightludeng1_1 = new SuperMap3D.SpotLight(spotLightPosludeng1_1, spotLightTargetPosludeng1_1, spotLightOtionsludeng1_1);
                scene.addLightSource(spotLightludeng1_1);
                // Add spotlight-horizontal road-street light 2
                var spotLightPosludeng1_2 = new SuperMap3D.Cartesian3.fromDegrees(xxx, yyy, 30);
                var spotLightTargetPosludeng1_2 = new SuperMap3D.Cartesian3.fromDegrees(xxx, yyy, 0);
                spotLightludeng1_2 = new SuperMap3D.SpotLight(spotLightPosludeng1_2, spotLightTargetPosludeng1_2, spotLightOtionsludeng1_1);
                scene.addLightSource(spotLightludeng1_2);
                // Add spotlight-horizontal road-street light 3
                var spotLightPosludeng1_3 = new SuperMap3D.Cartesian3.fromDegrees(xxx, yyy, 30);
                var spotLightTargetPosludeng1_3 = new SuperMap3D.Cartesian3.fromDegrees(xxx, yyy, 0);
                spotLightludeng1_3 = new SuperMap3D.SpotLight(spotLightPosludeng1_3, spotLightTargetPosludeng1_3, spotLightOtionsludeng1_1);
                scene.addLightSource(spotLightludeng1_3);
Note:
- ①For the specific usage of each light, you can refer to the online example:http://support.supermap.com.cn:8090/webgl/examples/webgl/ editor.html#lightSource
- ② For other special effects such as texture self-illumination and floodlight in the scene, please refer to the production process document of special effects.
2.4 The impact of HDR on the scene
The full name of HDR is High Dynamic Range (High Dynamic Range Image), which uses a larger dynamic range for lighting calculations to render the picture graphics.
If there is no HDR, the model that is too dark will be directly integrated into the black environment, and the model that is too bright will be directly displayed as white, lacking the gradient effect of the color.
HDR can ensure that the bright places are very bright, the dark places are very dark, and the details of the bright and dark parts are very obvious.
Only in HDR mode, the light ratio in the scene is more realistic, and the light source and self-illumination texture can have a correct display effect.
For example, in scenes with special effects, multiple light sources and texture self-illumination can be set to express rich light and shade changes and light and shadow effects between different areas. At this time, it is recommended to turn on the HDR mode. If there is only a single light source such as sunlight and ambient light in the scene, and the scene objects are evenly lighted, it is not necessary to enable HDR.

Figure 15

Figure 16
2.5 Processing of model baked texture
Sometimes you will encounter a model with two layers of textures, one of which is a common diffuse reflection texture that determines the appearance of the model, and the other layer is a baked texture that makes the light and shade of the model (usually through the baking function in 3ds Max production). In SuperMap iClient3D for In WebGL, a default parameter (scene.shadowMap.darkness) is provided to determine the overlay effect of the two to meet most needs. If you want to customize the overlay effect between the two, you can modify this parameter.
As shown in the figure, under the same lighting conditions, if the value of darkness is set to 1.0 in the above figure, the brightness of the overall scene is slightly lower, and the color tone is yellowish and reddish; in the figure below, the value of darkness is set to 1.275, and the brightness of the overall scene is somewhat Compared with the effect of the original model, the restoration degree is higher.
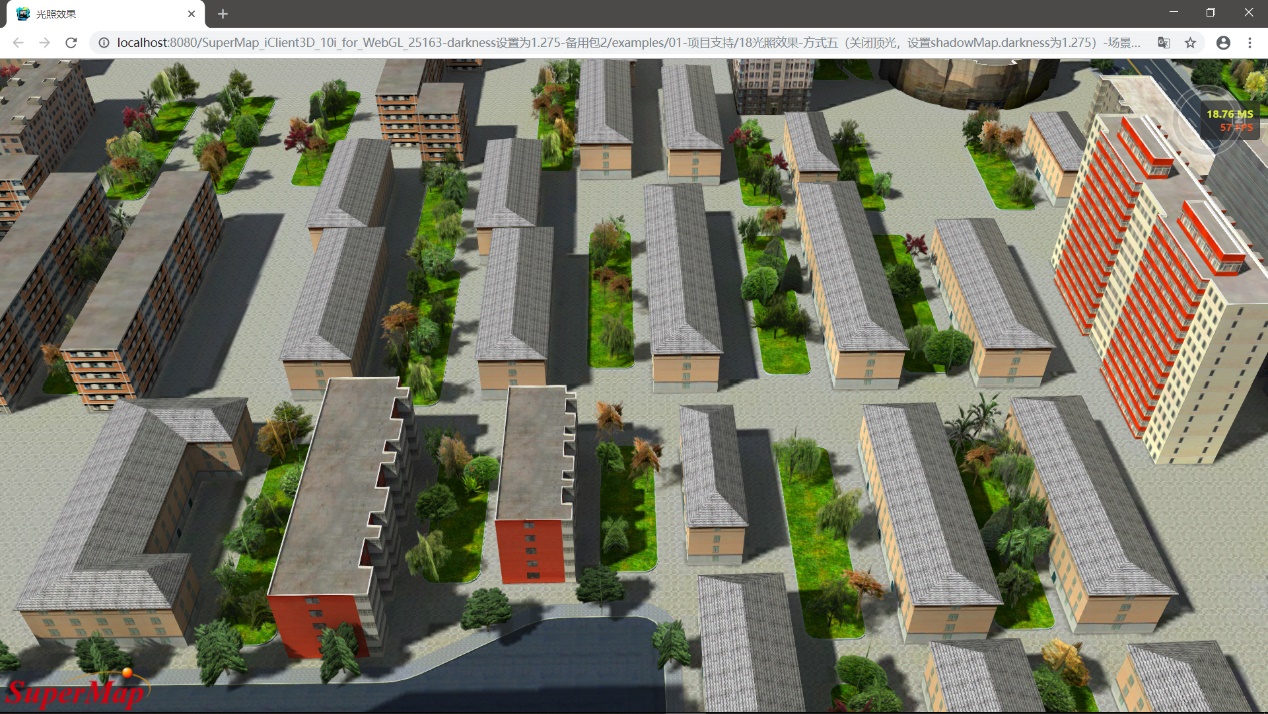
Figure 17
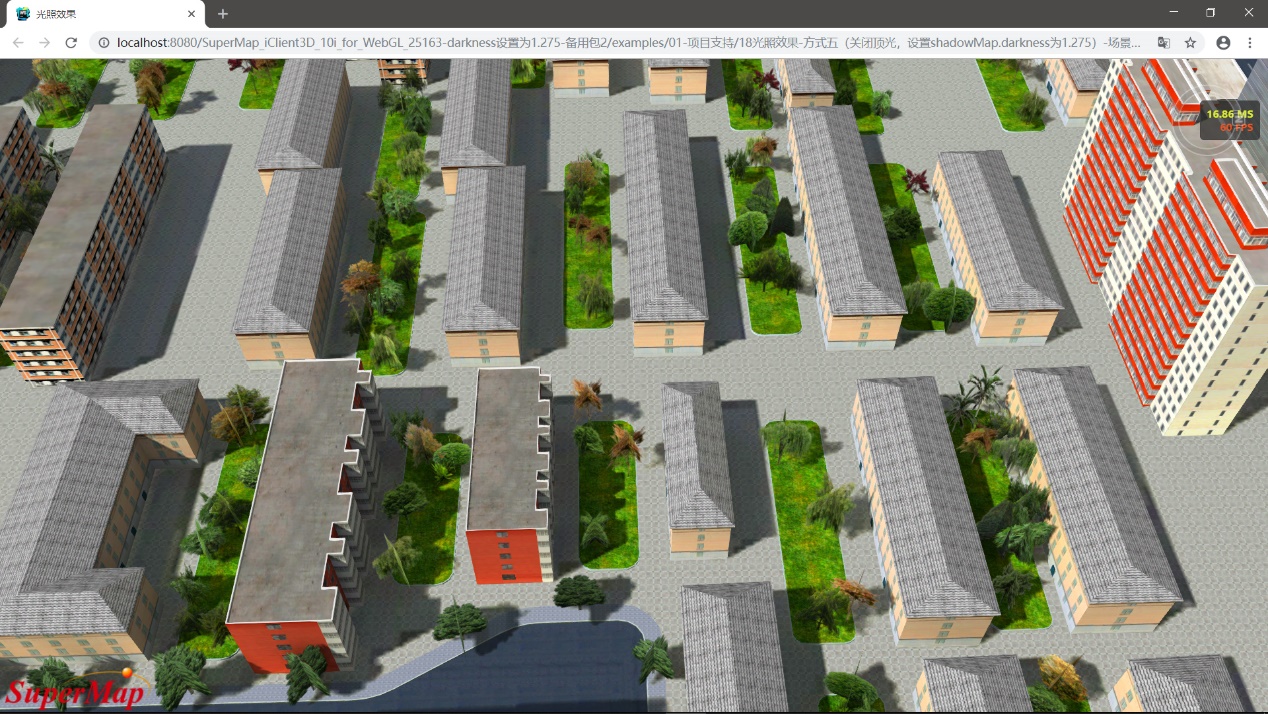
Figure 18
2.6 Scene/layer color adjustment
2.6.1Scene color adjustment
SuperMap iClient3D for WebGL provides a series of parameters for modifying scene color: brightness, contrast, hue, saturation, etc. When modifying this parameter, all objects in the scene will be changed.
For specific usage and effects, please refer to the online example:http://support.supermap.com.cn:8090/webgl/examples/webgl/editor.html#colorCorrection
2.6.2Adjustment of layer color
If you want to adjust one or some layers in the scene separately, you can use the layer color correction function. As shown in the figure, modify the hue of the tree layer separately (adjust the hue value from 0 to -1), and "modify" the autumn trees into summer trees. The setting code is as follows:
             var layer1 = scene.layers.find("c trees 11640@bird's nest");
             layer1.hue = -1;
             layer1.brightness = 1;
             layer1.contrast = 1;
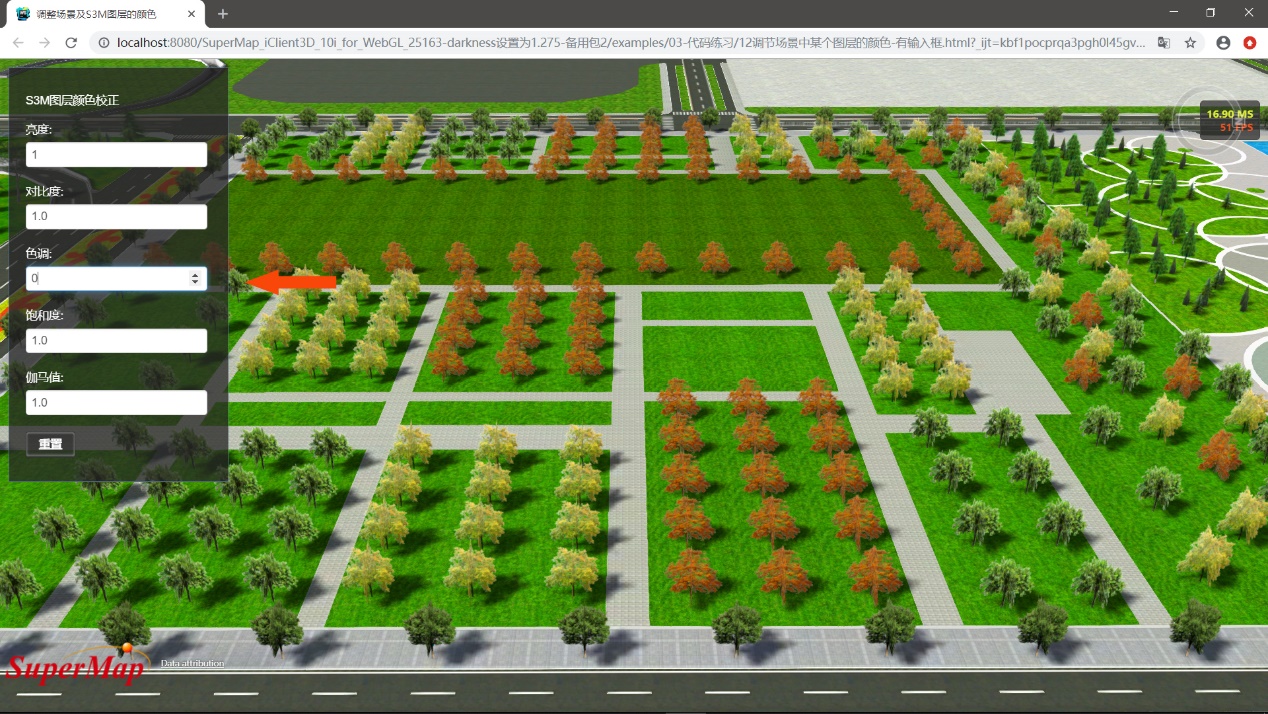
Figure 19
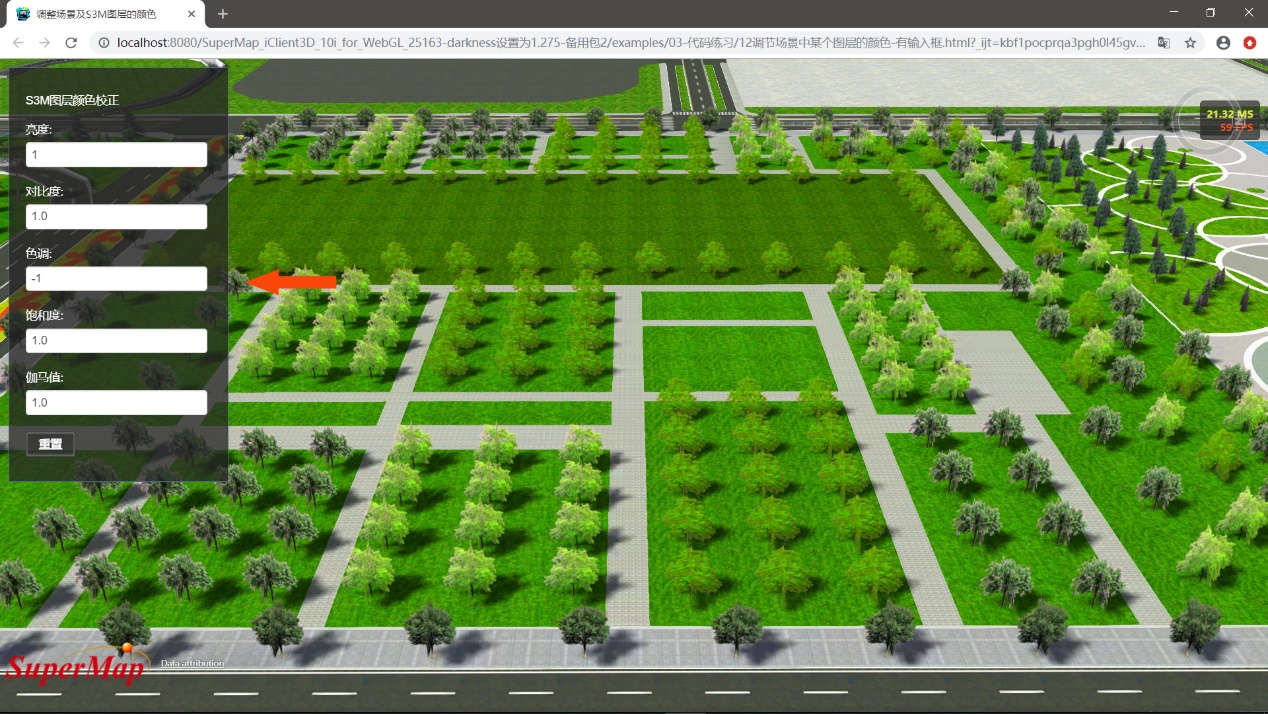
Figure 20
2.7 Optimize model boundary effects by enabling hardware anti-aliasing
In SuperMap iClient3D for WebGL supports enabling hardware anti-aliasing, which is used to improve the display effect of the model, especially for power towers, fences, street lights and other slender and hollowed-out models, the optimization effect is more obvious. How to enable hardware anti-aliasing: When initializing the viewer component, set requestWebgl2 to true and msaaLevel to 2-8 in the contextOptions attribute. The specific code is set as follows.
            var viewer = new SuperMap3D. Viewer('Container',{
                // anti-aliasing
                contextOptions: {
                    //Hardware anti-aliasing, the default value is 1
                    msaaLevel: 8,
                    requestWebgl2: true
                }
            }),
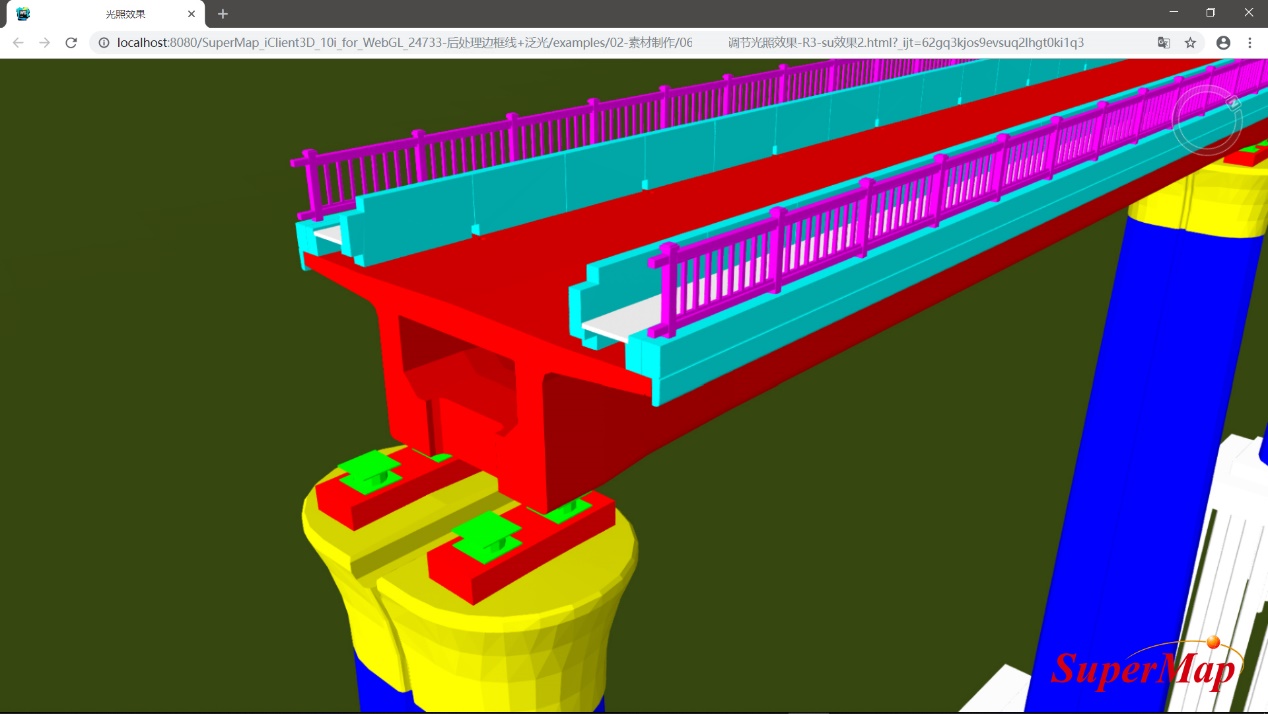
Figure 21
2.8 Optimize the display effect of the model through border lines
In design software, the display effect of the model is often optimized by displaying the border line of the model to make it more design sense, so in SuperMap iClient3D for Optimized line drawing on WebGL. Here we take fill and wireframe modes as examples to illustrate. The default color of the wireframe is dark gray, and the color can be modified as needed. The code settings are as follows.
         layer.style3D.fillStyle = SuperMap3D.FillStyle.Fill_And_WireFrame;
         layer.wireFrameMode = SuperMap3D.WireFrameType.EffectOutline;
For specific usage and effects, please refer to the online example:http://support.supermap.com.cn:8090/webgl/examples/webgl/editor.html#wireframe
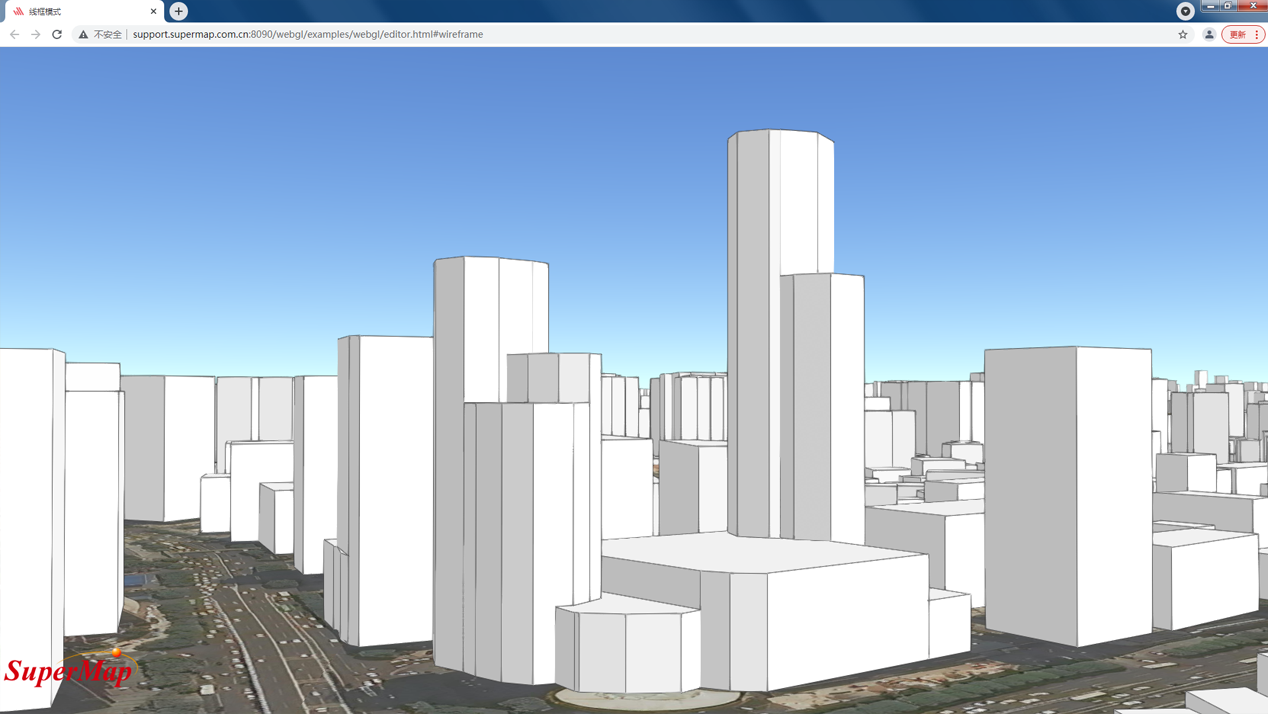
Figure 22
2.9 How to add a custom light source in a flat scene
How to add a custom light source in the plane scene of SuperMap iClient3D for WebGL.
In planar scenes, custom light sources are supported, but the position coordinates of adding light sources need to be Cartesian3.
1. If the data itself is flat data, after publishing the service, open it directly through SuperMap iClient3D for WebGL, which is a flat scene by default.
When adding a custom light source, the coordinates used cannot be opened by Supermap iDesktop to open the plane data, and then the coordinates obtained by coordinate query must be obtained by the front-end query.
Coordinate query method:
                // Pick up the coordinates of the clicked point
               var screenSpaceEventHandler = new SuperMap3D. ScreenSpaceEventHandler(scene. canvas);
               screenSpaceEventHandler. setInputAction(function (evt) {
                   var cartesian = scene. pickPosition(evt. position);
                   console.log(cartesian);
               }, SuperMap3D.ScreenSpaceEventType.LEFT_CLICK);
How to add light source:
            var position1 = new SuperMap3D.Cartesian3( 5522423.797161465, 460702.87773946195, 3157843.5904182503);
            var targetPosition1 = new SuperMap3D.Cartesian3(5522375.5857076915, 460656.85253924195,3157986.9535061973);
            var dirLightOptions = {
                targetPosition: targetPosition1,
                color: new SuperMap3D.Color(1.0, 1.0, 1.0, 1),
                // color: new SuperMap3D.Color(1.0, 1.0, 1.0, 1),
                intensity: 1.55
            };
            directionalLight_1 = new SuperMap3D.DirectionalLight(position1, dirLightOptions);
            scene.addLightSource(directionalLight_1);
2. If the data itself is spherical data, you only need to set the opening method when opening it to add the data to the plane scene,
            //plane scene
            viewer.scene.mode = SuperMap3D.SceneMode.COLUMBUS_VIEW;
            // open the scene
            scene.open(URL_CONFIG.SCENE_CBD);
And there are two ways to add light sources:
- ①Through the above method, add the coordinates obtained by query;
            // add spotlight
            var spotLightPosludeng1_1 = new SuperMap3D.Cartesian3(-2179640.6821754016,4379810.971923672, 4092349.589765973);
            var spotLightTargetPosludeng1_1 = new SuperMap3D.Cartesian3(-2179672.0304557816, 4379901.146983794, 4092488.1975491447);
            var spotLightOtionsludeng1_1 = {
                color: new SuperMap3D.Color(6, 4, 0.2, 1),
                distance: 550,
                decay: 1,
                intensity: 9,
                angle: Math.PI / 2
            };
            spotLightludeng1_1 = new SuperMap3D.SpotLight(spotLightPosludeng1_1, spotLightTargetPosludeng1_1, spotLightOtionsludeng1_1);
            scene.addLightSource(spotLightludeng1_1);
- ② also use latitude and longitude coordinates to add;
            var position1 = new SuperMap3D.Cartesian3.fromDegrees(116.261209157595+0.000009405717451407729*70.7,  39.3042238956531-0.00000914352698135*70.7, 480);
            //light direction point
            var targetPosition1 = new SuperMap3D.Cartesian3.fromDegrees(116.261209157595, 39.3042238956531,430);
            var dirLightOptions = {
                targetPosition: targetPosition1,
                color: new SuperMap3D.Color(1.0, 1.0, 1.0, 1),
                // color: new SuperMap3D.Color(1.0, 1.0, 1.0, 1),
                intensity: 0.55
            };
            directionalLight_1 = new SuperMap3D.DirectionalLight(position1, dirLightOptions);
            scene.addLightSource(directionalLight_1);