The registration layer and the reference layer reflect features in a relatively close geographic area, so you need to click at the position of each feature in the registration layer, meanwhile, find out a point of the same name at the corresponding feature position in the reference layer.
The essence of the procedure is identifying series of control points (coordinate x, y) to link the registration layer and reference layer. The control points are positions which can be recognized accurately in both the registration dataset and actual coordinates.
The registering precision greatly depends on the accuracy, quantity and distribution of selected control points. When you are selecting control points, you should notice:
- The control points should be the feature points that are fixed, clear, and easy to be recognized like road intersections, river trunks, field corners and so on.
- The distribution of control points must be even, the more dens. The more dense the control points, the more accurate the registration. With the control points, the trend of the registration layer can be reflected.
- The number of control points should be moderate. You should select control points according to the real situation and the number of points must meet the condition of corresponding algorithms.
 Basic steps
- In the Registration tab and on the Browse group, a series of operations are provided for browsing maps, and adjusting the background colors of windows.
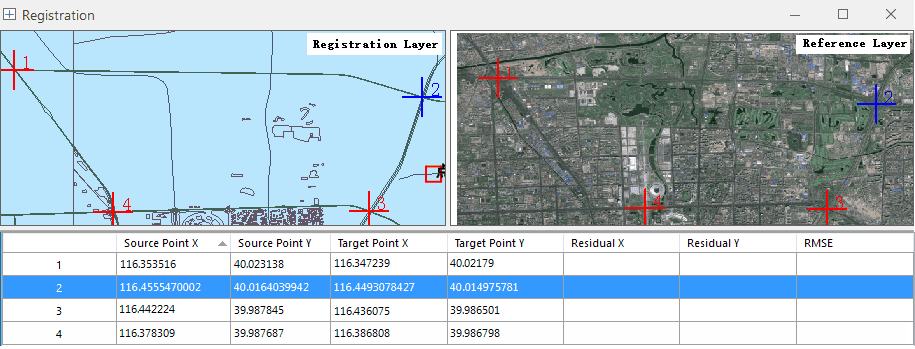
- In the “Control Point Settings” group, click “Pick” to begin to select control points and left click to determine every control point, at the same time, the application will assign a number to the point and its coordinates(source point X, source point Y) will be shown on the control point list table.
- In the reference layer, at the appropriate position, left click your mouse to add a point, and its sequence number will be assigned by the system automatically corresponding to the point at the same position in the registration layer, and its coordinates (target point X, target point Y) will be shown on the list table.
- Repeat the step 2 and step 3 to select multiple control points. Four control points in the following picture are selected.
Import Control Point
Import the current point dataset as registration points and reference points.
- Three function entrances are provided:
- In the “Control Point Settings” of “Registration” tab, click on the “Import” button.
- In the registration map window, right click the mouse and select “Import control points”.
- Right click on the control point list window and select “Import control points”.
-
In the pop-up window, set following parameters:
- Registration Point: Checking the box allows users to select a point dataset in the current workspace as the registration points.
- Reference Point: Checking the box allows users to select a point dataset in the current workspace as the reference points.
- Clear the current points: Checking the box will clear all control points existing in the current map.
- Click “OK” to import control points.
Export control points
Export all control points picked by the user as a point dataset.
-
Three function entrances are provided:
- In the “Control Point Settings” of “Registration” tab, click on the “Export” button.
- In the registration map window, right click the mouse and select “Export control points”.
- Right click on the control point list window and select “Export control points”.
-
In the pop-up window, set following parameters:
- Registration Point: Checking the box allows users to export registration points in the current workspace as a point dataset.
- Reference Point: Checking the box allows users to export the reference points in the current workspace as a point dataset.
- Click “OK” to export control points.
 Related topics
- After completing the selection of control points, execute the next operation: Step 3 Calculate Errors.
- You can refer to Import/export a Registration Information File for how to import an existed control point file, or to save control points you have selected for further usage.